Pitot tubes and why using the right size really matters
Part of the dryness equipment needed to perform the dryness test there is a Pitot tube. If you look in EN285 there is a list of pitot tube sizes and the pressure range to use them
Up to 3 bar 0.8mm
Up to 4 bar 0.6mm
Up to 7 bar 0.4mm
So what is the purpose of hole size?
I can only think the decision was arbitrarily made back in the 1970’s as a way of preventing too much steam entering the Dryness Flask too quickly.
We have always recommended that you use only the 0.8mm pitot tube. Unfortunately some organisations have taken the values literally. Causing a lot of wasted time and money as they struggle to cope with failing tests.
To fully understand the effect on the result on the Dryness test that the pitot tube has we need to go back to basics of how the test works.
The process relies on heating the water in the flask and determining the temperature increase and the weight increase. Any extra water entering the flask adds to the weight but very little to the heat increase. So it will reduce the dryness value.
An understanding of how water is carried in the steam supply
Water in a steam supply is carried in basically 2 ways
1 On the walls of the supply tube, on the top and sides but mostly the bottom
2 Suspended in the steam itself
A proper steam system by design will have steam traps. These devices are designed to drain off the water flowing along the bottom of the tube. To remove the water suspended in the steam flow itself you need a Steam separator. There are a number of designs out there but not a concern for now.
The test elbow used in the dryness test has a very important function and that is to place the pitot tube in the middle of the steam pipe so it is not contaminated with water from the walls of the tube. After all, a properly designed system will be trapping that water off.
So we have droplets of water flowing in the steam they are being carried along at approximately the same velocity as the steam itself. The Pitot tube placement is designed to sample that steam.
What could affect the result of the dryness test?
1.The obvious parameter is the amount of water in the steam flow, The more there is the worse the result
2.Heat loses that cause the steam sampled to lose heat before it can heat the water
3.The time it takes to perform the test.
Point 1 is obvious
Point 2 is not so obvious, but think back to the test itself, it relies on the energy input versus the weight increase. The dryness value changes as the expected weight increase versus the actual change. If you lose energy to the environment then that heat is not warming the water and the condense created adds to the weight.
Point 3. I hope by now you can see that the longer it takes to complete the test the more heat you lose, the more condensate added to the water collected, the worse the result.
Ok so why not just insulate the rubber tube and other fittings? This is in fact a good idea as it will help a bad setup to pass.
This does not however explain all the issues caused by a slow test.

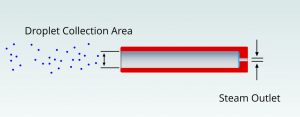
Fig.1
If you look at Fig 1 you will see the other issue. The size of the pitot to be does not dictate the amount of water droplets entering the pitot tube. The ID of the tube itself is the biggest factor.
At TJB Systems we always use a pipe with a 4mm id. It’s not that we have deemed 4mm to be the ideal size, it’s that we want to be consistent.
Again back to Fig 1 you can see that no matter what size the pitot tube hole is, the volume of droplets entering the pitot tube will be the same. It will also obviously change in relation to the velocity of the steam but we cannot account for that.
So if the volume per min stays the same but the time to heat the flask takes longer due to a smaller pitot tube, it’s obvious you will end up with a worse result.I hope you can see now why the size of the pitot tube is so important.
What size is the right size Pitot tube?
To establish this you need to work back from the time you want your tests to take. There is no set defined time but from my experience and others it is 4-5 mins. There is no rationale to this apart from it seems right.
Now with 4-5 mins test time as the goal how do you work back to the pitot tube size. Well it’s hard work, but we did it for you. In our SQI test and report app available on Android and PC we have included a utility to do the maths for you.
Simply input the pressure of the steam system and the app will tell you the expected test time based on a variety of pitot tube sizes.Choose your time period and select the pitot tube to achieve it
Alternatively use these sizes
• Steam Pressure 1.5-2.0 barG = 1.0mm
• Steam Pressure 2.1-2.7 barG = 0.9mm
• Steam Pressure 2.8-3.7 barG = 0.8mm
Steam Quality Innovations aka TJB Systems can can supply a number of standard sizes 0.6, 0.7, 0.8, 0.9, 1.0, 1.1, and 1.2mm in a variety of fitting types. From threaded and Triclover to Fedigari


